I congratulate you for making the decision to learn how to start a blog using this simple step-by-step guide. It’s a great opportunity for any aspiring blogger to learn without having any coding skills or previous blogging experience. Best of all, it’s completely free!
This guide has been structured to take you from a complete novice to a professional.
So let’s start!
Click on any of the topic below to take you there.
Step #1: Choose your perfect blog niche
Step #2: How to choose a memorable blog name or a domain name
Step #3: Buy hosting and get a free domain name
Step #4: How to install wordpress on bluehost
Step #5: Understand the wordpress dashboard
Step #6: How to install a blog theme
Step #7: Start creating your blog content. Your 4 first blog post idea
Step #8: What to do after your post is published
How to start a successful blog with the right mindset
Many people fail to start their blogs with the right mindset and the right mentor. This invariably leads to not having a proper plan in place to succeed, and ultimately failure.
Blogging is a business, and if you are going to be successful in it, you have to develop a business mindset.
There are two different kinds of bloggers.
The ones that blog for passion and nothing else.
And the ones that make a living from their blogs.
The first group of bloggers sees blogging as a hobby, while the second group sees it as a business.
In order for you to succeed in blogging, you have to learn to see your blog as a business.
Professional bloggers understand this perfectly.
This is why they enjoy the lifestyle only digital money can provide.
Before jumping into my tutorials, I want you to develop the right mindset to succeed.
The beginning is usually the hardest. But once you’ve crossed this hurdle and put a proper structure in place, the money will start rolling in.
I’m going to train you on blogging strategies that work. But you have to work hard to make your blog successful.
The strategy you will learn here can be used in any niche.
Therefore, whether you want to start a fashion blog, a travel blog, a food blog, a stay-at-home mom blog, a family blog, or a Christian blog, the strategy you are going to get here will work.
I congratulate you once again because you’re going to get the right tools to grow stronger and become more resilient in growing your blog.
So, you may be asking why I’m qualified to teach you how to start a blog…
I have been blogging for about 6 years now. And it’s been an interesting journey of trials, errors, failures, and success. I have seen the in and out of blogging. And I want to share with you everything I learned along the way.
With the blogging experience I have under my belt, I have been able to grow this blog from writing tutorials on “how to start a blog” to adigital marketing agency.
You’ll be amazed at the kinds of skills you’ll acquire in the course of blogging.
Skills like content writing, search engine optimization, graphic designing, social media marketing and much more will easily come to you.
Blogging is an exciting job that can give you a lifestyle that words cannot effectively describe.
You’ll also be surprised at how easily you’ll be able to generate passive income from your blog when you put in the needed work to put up a functional structure.
Having said that, let’s quickly look at how much it costs to start a blog. How much does it cost to start a blog?
How Much Does It Cost To Start a Blog?
Starting a blog is super affordable. You need only pay for Webhosting, blog theme and email service.
These costs are not just to start but also to design your new blog and to help you begin getting subscribers to your blog.
So, let’s start your blog!
Step #1 Choose your perfect blog niche
What is the blog niche?
A blog niche, in simple terms, is a carefully selected topic you will be building your blog around.
When you want to start a business, the first question you ask is, “What service or product should I provide to make money?”
This is the same way it is when you want to start a blog.
Your question should be, “What topic do I go into so that I will be able to provide services and products, and at the same time make sufficient money for myself?”
If this is your mindset, I promise you, you’d have tackled the first hurdle in blogging.
Choosing a niche is your first step in blogging. Every blog needs a niche. Some have multiple niches.
Because you are just starting, I’d strongly recommend you begin with one niche. Examples
of niches you can go into are health and fitness, relationships, family, and finance, cooking, and much more.
Choosing a niche is not as difficult as you may think.
The popular advice from bloggers is to choose a niche you are passionate about. And their argument is that you can keep the blog going for a long time, even in the face of adversity. No doubt, some have followed this route and become successful.
But there are instances where you have to look beyond ‘passion” in choosing your niche!
Although passion is a great place to begin, you should also look at the profitability of the niche.
Making passion the only factor for choosing a niche without considering its profitability will only lead you to frustration years down the line.
So, how do you choose your blogging niche?
The one factor I’d advise you to consider is “the opportunity” in any niche you want.
When the money starts coming in, you’ll get passionate about it.
I want you to look for a niche with the opportunity to generate income.
What is so fortunate about this is that you don’t need to overthink this.
Choosing the perfect niche is not complicated.
There are many profitable niches out there.
Some niches are evergreen, while others are trendy and perform well in specific periods. The niche you choose will determine how much money you can earn from your blog.
However, the good news is that you can make money from most niches nowadays!
If you can’t readily come up with a niche, let me take you through these steps to help you.
Step #1: Make a list of 2-5 passions and areas of expertise to get niche ideas
Passion: We will begin our search by looking at your passion. This is always a great place to start. Make a list of activities that get you excited. For example, do you love cooking, talking to people, reading, hockey, playing the piano, painting, teaching, travelling, games, photography…? Write down the activities as they come to you.
Get inspirations from this quiz:
What do you like to read?
what would you prefer to do on a weekend?
If you could do any other job, what would it be?
What are the social media pages you love to follow?
What are the blogs or youtube channels you subscribe to?
Your passion is that activity you love doing even when you are not paid for it.
Your skills or expertise: Another way to come up with a potential blog niche is to take inventory of your current skills and expertise.
Quickly, you should be able to come up with a list of between 2-5 activities looking at your expertise and passion.
Step #2:Identify 4 sub-niches in each of your potential niches.
With your 2-5 niches in hand it’s time to come up with subniches. Subniches are segments of your niche.
For example, in the food niche, there are breakfast, diet meal, dinner, outdoor catering, vegan meals, weight loss meals…
When you further concentrate your efforts on a smaller segment of your niche your chances of success are even higher because your audience is defined.
You’ll experience lesser competition from already established brands, and you can monetise your blog effectively.
Now, it’s time to identify your sub-niches.
You can quickly do this by brainstorming ideas. Without thinking anything else write areas of interest in your niche. This may be personal or professional areas.
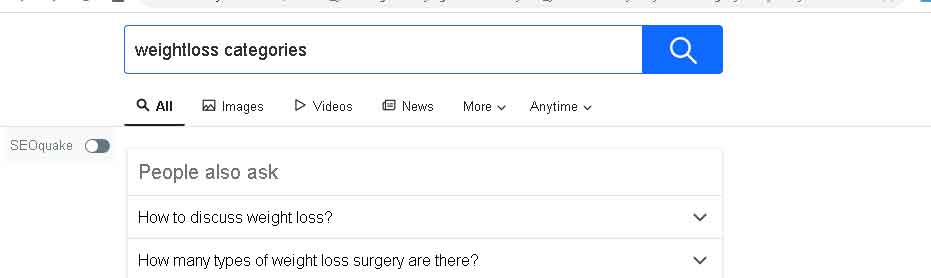
Or use google search.
a. Go to google.com
b. Type your niche category like this…’ weight loss category.”
c. Scroll down to the bottom of the page, you will see “searches related to your niche.”
d. Choose the keyword that best fits your niche. Write it down. Repeat the process with every niche you have on your list
Step #3: Find the potential of your niche in terms of monthly volume and competition.
Your potential niche must pass these 3 tests to qualify as your chosen niche.
1. The size of your target audience must be large enough.
2. The competition must be average or low. Though high competitive niches sometimes indicate a high potential to make money from it. However, it’s a gold mine to get a less competitive niche that is profitable.
3. Profitability of the niche.
By now, you should have a list of 2-5 niches and a list of 4 sub-niches in each of your potential niche. So, you should have between 8-20 sub-niches on your list.
With your list in hands, we are set to know the search volume and competition.
To search for the volume of the keyword,
I usually use a search tool called word tracker.com; A simple keyword research tool for beginners. This keyword search tool will ascertain the volume search and the competition.
The competition tells you how easy it is to rank in your niche.
Competition between 10 to 40 is good enough for you to compete as a beginner. Still using the example of weight loss. wordtracker.com gave me these searches…
Keyword
Volume search
competition
Weight loss program
35,183
20.89
Best diet for weight loss
34,775.
13.12
Weight loss clinic.
34,067.
23.95
Exercise to loss weight.
30,593
11.56
Wordtracker did a good job here! It gave us new sub-niches that will didn’t find in the google search above.
If you are interested in a weight loss program, this is a gold mine for you!
Look at this. “the best diet for weight loss” has a search volume of 34,775. This is a large audience and the competition is low.
As a rule of thumb, your niche should be getting traffic of a minimum of 5,000 to be worth your time.
#4. Determine the profitability of the niche.
So far, we have validated our niche based on monthly search volume and competition. The next step is to validate for profitability.
It’s not enough to cater to an audience who is not willing to spend money in your niche.
We only want to put our strength where we’ll get our desired results.
Right?
So, let’s find out if the solution you are going to provide can put money in your bank account.
a. Find out if there are products and services on sale in the niche.
The best niches are those that have lots of digital and physical products on sale.
We just want to see proofs that people do buy things in this niche and are in high-volume
Here’s how to check:
Input your niche on Google search engine to see if advertisers have products and services for sale. For example, still using our example of weight loss.
You can see that we have a lot of advertisers already selling in this niche. Some are selling weight loss supplements, other weight loss program, you also see weight loss diet on sale. This is a strong signal that you have a huge potential to make money from this niche
Other places you can check for the profitability of your niche is amazon.com. Search for your niche and see if there are products on sale.
You can also search blogs in your niche to see how they monetise their blogss.
There is definitely a good search for “weight loss” for any blogger that wants to go into the niche.
Now that you’ve been able to determine your niche.
Let’s move on to the next step in creating your blog- Blog names and domain.
Step #2 How to choose a memorable blog name or domain name
If you have already decided on your blogging niche then it’s time to select your domain name.
I will teach you how to come up with a memorable domain name in no time.
First, I want you to understand that coming up with your domain name isn’t difficult. Unfortunately, most people overthink it and end up procrastinating starting their blog.
I want to encourage you to follow my training to the end and immediately pick a name for your blog. This will enable you to move to the next step in starting your blog as quickly as possible.
One of the problems with starting a blog is the inability to quickly make decisions.
I’m going to help you today to take a quick decision in choosing your blog name.
When choosing a blog name and domain name, the choice often comes down to either brandable or descriptive.
What is the difference between a brandable name and a descriptive name?
BRANDABLE DOMAIN NAMES
Brandable names are names that do not describe the content of their blogs. While descriptive names are names that describe what the blog has to offer.
Examples of brandable names are Amazon, Cosco, Apple, Google…Without the brand awareness, would you have ever thought apple represents computers and phones?
Brandable domain names are uniquely different from their competition.
DESCRIPTIVE DOMAIN NAMES
Descriptive domain names or blog names are names that describe what the blog has to offer. They often have their keywords added to their names. For example; samdaycare.com, fitnessblog.com salon.com, antiaging.com, foodpeople.com.
People immediately know what your site is about.
The advantage brandable name has over the descriptive name is that if you have a long term plan to expand your blog to other niches in the future brandable name allows you to do this.
Unlike a descriptive name that is restrictive to a niche.
However, brandable names are not good with every blog. Many blogs succeed with descriptive names.
As you read further, you will discover the advantage of using a descriptive name.
WHICH TYPE OF DOMAIN NAME SHOULD YOU GO FOR, BRANDABLE OR DESCRIPTIVE?
Whichever way you choose to go is really up to you.
But, do consider making the name descriptive to immediately informed visitirs of the purpose of your blog.
Research has shown that businesses with names that identify their products or services are more successful than non-descriptively named businesses.
This is because visitor find it easier to identity the niche than business with brandable niches.
This increase the clickthrough rate to the blog and also have impact in social sharing.
Carefully consider the name to choose. But, be informed that it’s the content you create on your blog that make your brand.
6 TIPS FOR CHOOSING YOUR PERFECT DOMAIN NAME
TIP #1:
As much as possible let your name identify your niche
For example, my blog name is “the online compass.”
Anyone that comes across the name knows to a large extent that it has a lot to do with an online business.
TIP #2:
Let your domain name be short and memorable. Best to make it brandable and descriptive if you can.
TIP #3:
Don’t make your domain search engine unfriendly by stuffing it with keywords
This is what you should do: peterlaundry.com = Peter (brandable) +laundry (descriptive)
This is what you shouldn’t do: bestlaundrybusiness.com
Anyone who sees peterlaundry.com knows it has to do with laundry. But, it’s not as keyword-stuffed as bestlaundrybusiness.com.
TIP #4:
Go for the top-level domain names with a preference for dot.com domain name.
Note: Top-level domains TLDs are strings of letters at the end of your domain name, for example .net, .org, .ca, .info etc
TIP #5:
Target your area.
If your blog or business is targeting a particular area, you may consider adding the name of the city or country to your domain. This helps your search engine optimization, and help more relevant people to find your sites. It also adds familiarity and trust to your business. You may consider adding .au if your business is localized in Australia, or adding .ca if Its target traffic in Canada. If it Nigeria add “ng'” Note: this is only for those whose businesses are location specific if yours’ not then go for – .com.
TIP #6:
If necessary get creative by using a domain name modifier.
There are times when your desired domain name may not be available when you do a search with a domain registrar, this is when using a modifier such as a prefix or a suffix is another way to come up with a unique domain name.
This is the way I came up with my domain name theonlinecompass.com, I had to add the prefix “the” because the name “online compass” wasn’t available.
This may not be the best example because if I had the experience I have today when I started my blog, I would have come up with a more exciting name for my blog.
So, Feel free to add a modifier to your domain, but keep it simple.
To make choosing your blog name and domain more explicit let’s go through the following steps together.
STEP BY STEP GUIDE TO CHOOSE YOUR PERFECT DOMAIN NAME IN 10 MINS
I’m going to pick a niche and come up with a bunch of names. At the end of it, you should be able to come up with your blog name in 10 minutes.
Step #1. I hope you have chosen your niche by now. If you haven’t, no problems! Simply go to my training on how to choose a niche
For the purpose of this training, we shall be using the niche “homeschooling.”
Step #2: Gather a list of words related to homeschooling and write them down. Such as Teneeger, children, tender, convenient be learning, afternoon, morning, evening, homeschooling. Mummy tutoring,.teaching mom, home study, home study, private classes, coaching, home tutoring,
Drill, lead, guide, mentor, coach. nurture…
Write it down as fast as it comes to your mind..
Step #3. Add your name to the list of words. For example, Alice.
Step #4: Also, write down the best words that describe what you are going to do on your blog.
For example, “resourceful.”
Step #5:
Expand each of the above to get more related words by using the therausus dictionary to find synonyms. For example, tutoring.
You should come up with more words like private teacher, coach, assistant, after school, educator…
Step #6: Now that we have come up with related words, if you mix and match well you will come up with a blog name.
With the above, here are memorable blog name
“coachdrill.com,”
“tendermentor.com”
“homecoaching.com”
“funcoach.com”
“girlsprivatetutor.com”
“homeclasses.com”
“schoolguide.come”
“ekihomeschool.com’
“ekidrill.com”
“ekitutor.com”
‘hometutor.com’
Now that you have come up with your blog and domain name. You have to get it registered to claim ownership of it. So, we shall be moving on to Bluehost where you will be doing that for free.
Let’s move to the next step on how to start a blog.
Step#3: How to start a blog on Bluehost- Buy Hosting and get a free domain
Once you’ve decided on a blog name, the next step is to set up hosting for your blog. There are different super hosting services on the market.
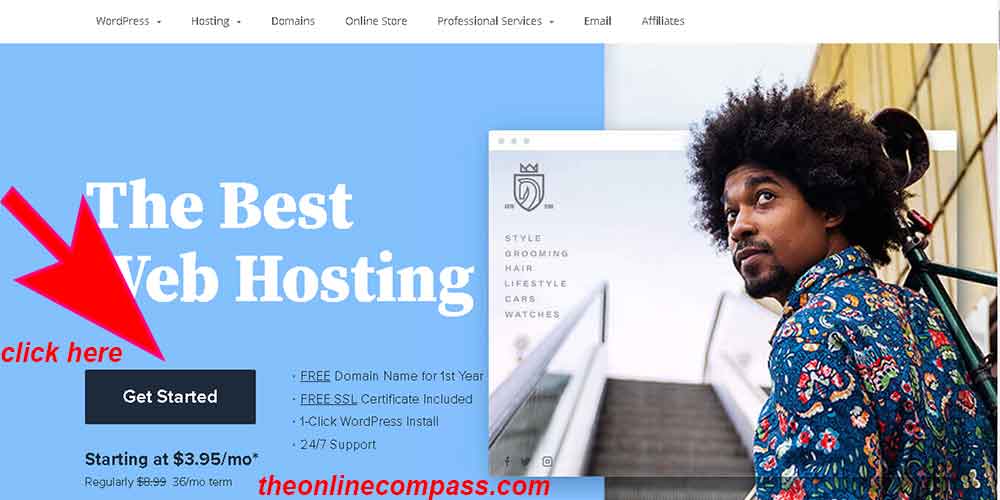
Blue host has been my choice hosting service and I recommend it because:
1. With Bluehost you save money on a domain because you’ll always get one free when you buy hosting.
2. Bluehost has an affordable hosting package for beginner bloggers.It also has one of the best pricing options among the most popular web hosting companies. You enjoy 63% discount from Bluehost when you use my link with as little as $2.95 / month.
3. You enjoy excelllent security from blue host because they have tight system in place to fence off hackers.
4. It’s highly respected for WordPress CMS site hosting, It’s wordpress #1 recommended hosting service since 2005.
5. Blue host support service is second to non. The customer services do their best to ensure that support issues are addressed promptly. I’ve had positive experiences with the support staff. They were times I’d push issues on my blog to them and they’d gladly and promptly help me out.
6. Their refund policy is super. If you decide you don’t want the service anymore, Bluehost will refund your money. The refund is usually hassle-free. Within the first 30 days, you’ll get a full refund.
7. Blue host provides free professional webmails when you purchase hosting with them. For example, instead of using name@yahoo.com for your blog. Bluehost will provide you a professional email like this- name@theonlinecompass.com.
8. You also get a free SSL certificate signally to google search engine that visits to your blog and private details of your visitors are safe on your blog.
With your domain in hand, let’s get your blog hosting from Bluehost!
SIMPLE STEP BY STEP GUIDE TO BUYING HOSTING AND GETTING A FREE DOMAIN IN BLUEHOST
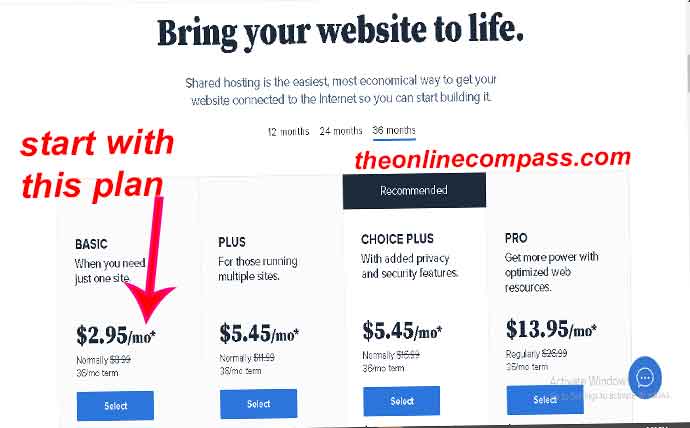
Step #2: Choose the best Bluehost plan for a beginner blogger.
A shared basis plan is the most economical plan for starting your blog.
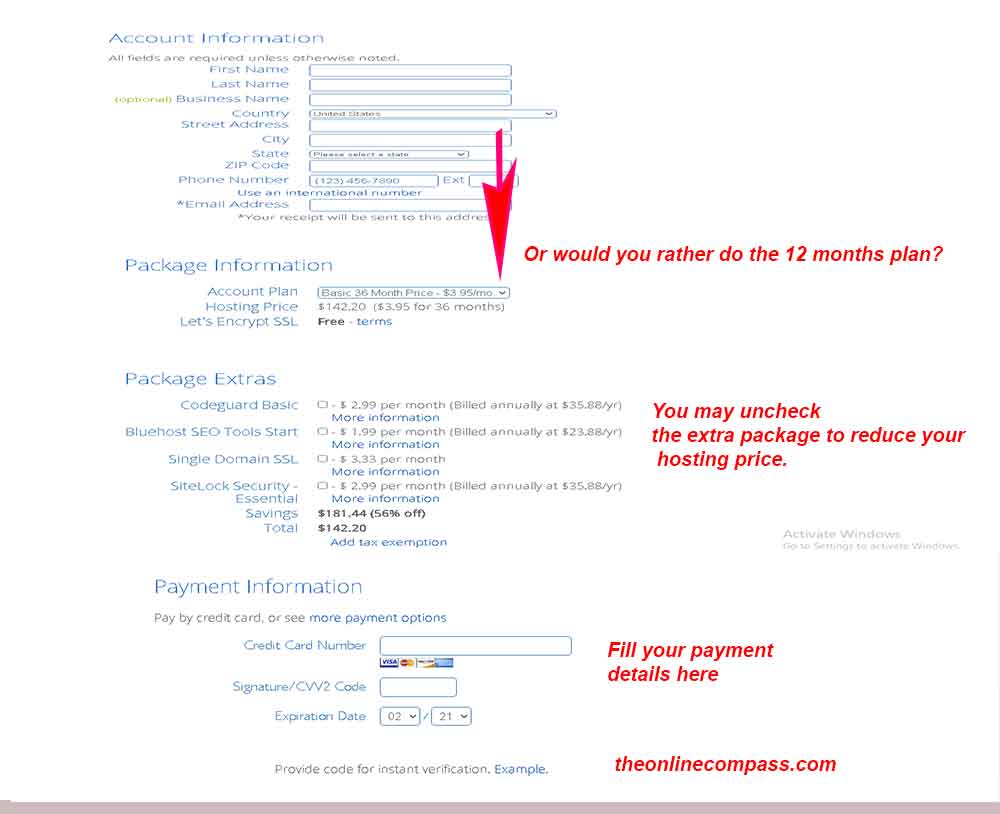
It’s advisable to buy 36 months of hosting because you are getting it at a really low discount. And you wouldn’t have to think about buying hosting in the next three (3) years, which will give you enough time to concentrate on building and earning income from your blog.
However if you cannot afford it, for now, go for the 12 months of hosting. 12 months is ample time to start getting returns from your blog.
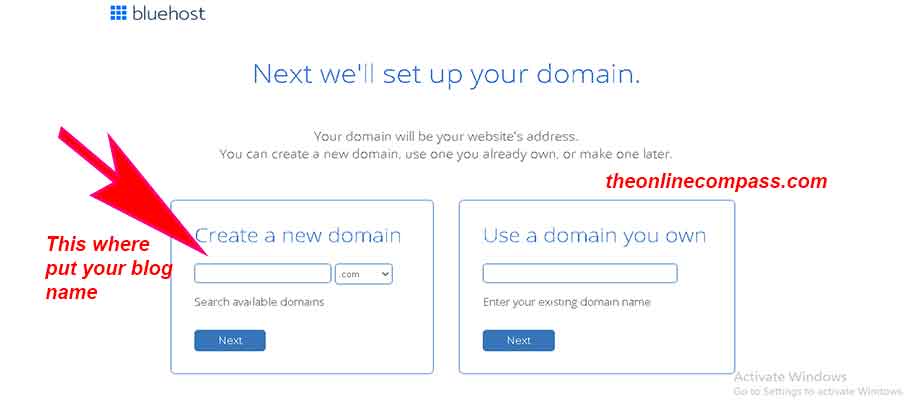
Step #3: Create a domain name for free in Bluehost
If you’ve gone through the process of getting a blog and domain name successfully, enter it into the “create a new domain” section. Remember to use the dot com(.com) as your first TLD option.
If your domain name isn’t available, go ahead with buying the hosting by scrolling down the page and click on “skip for now” or “create domain later.” This will take you to the next step to purchase your hosting., you can claim your free domain when you are ready.
POST UPDATES: BLUEHOST MAY DISPLAY A DIFFERENT AREA FROM THE GRAPHICS BELOW TO CREATE YOUR NEW DOMAIN. THERE IS NO CAUSE FOR ALARM. ENTER YOUR DOMAIN AND CONTINUE AS DIRECTED.
Step #4: Create your account.
Be careful to fill in your account information correctly because your Cpanel login details will be sent to you using the information you provided.
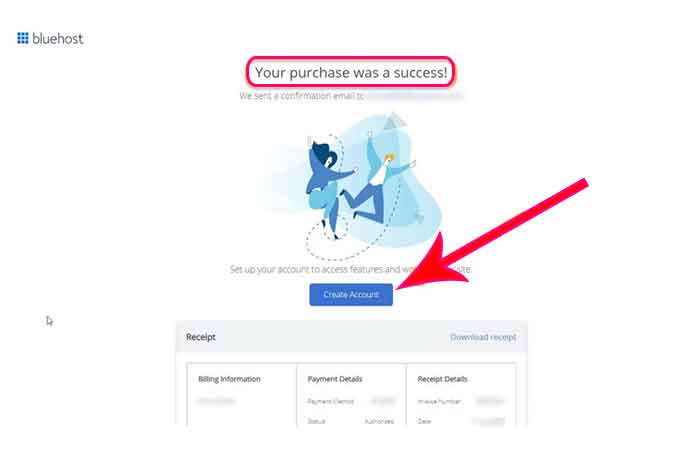
Bluehost will confirm thesuccessof your purchase, and prompts you to create an account for your login and password.
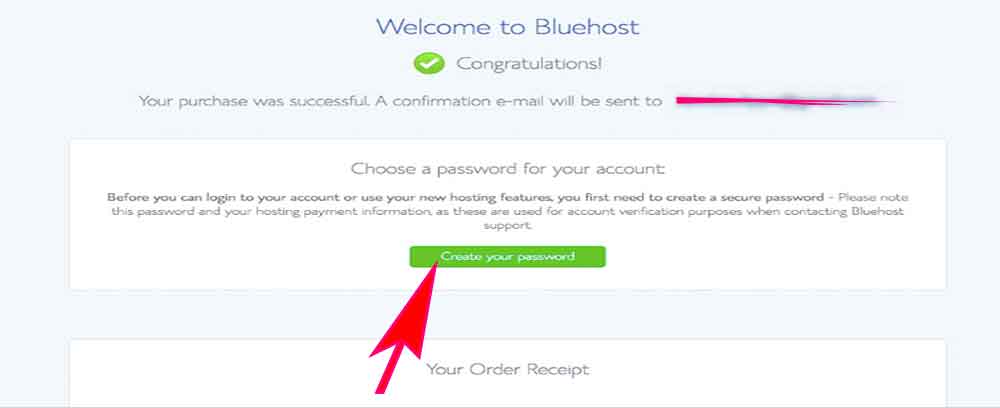
Step #5: Next, you will be prompted to create your password.
Click Create your password to complete your blog hosting setup.
Ensure you create a secure password! And keep it safe because you will be needing it for your login.
Your receipt will be sent to your inbox.
Step #4: How to Install WordPress on Bluehost
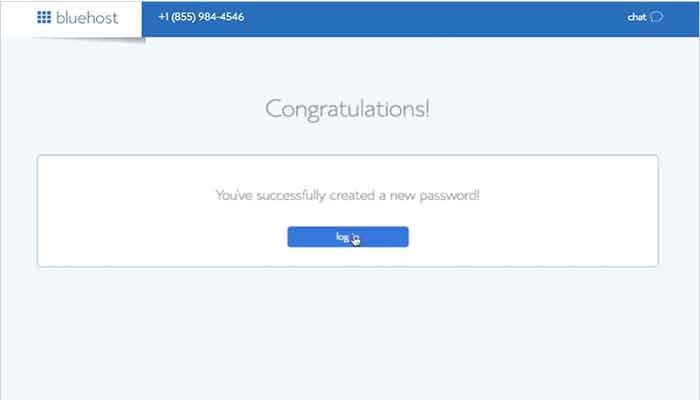
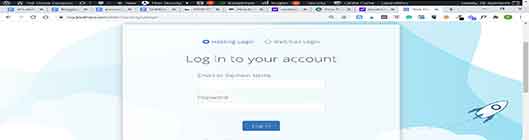
Once you’ve successfully created your password, you will get a congratulatory message.
The next step is to log in to your account page. Click on hosting login. Fill in your domain and the password (that’s the password you just created) and click login.
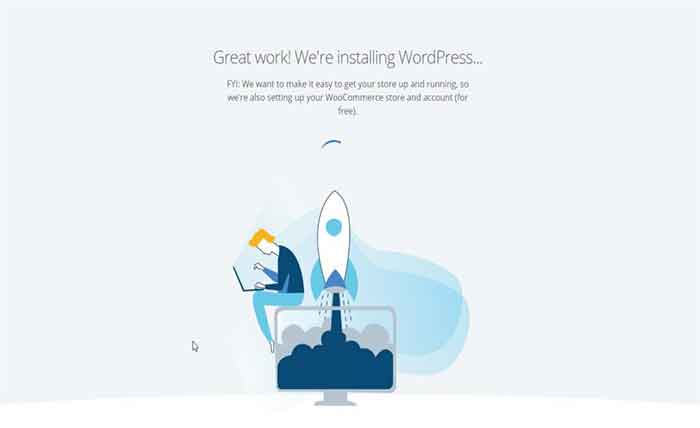
Bluehost will automatically install WordPress right from your hosting dashboard.
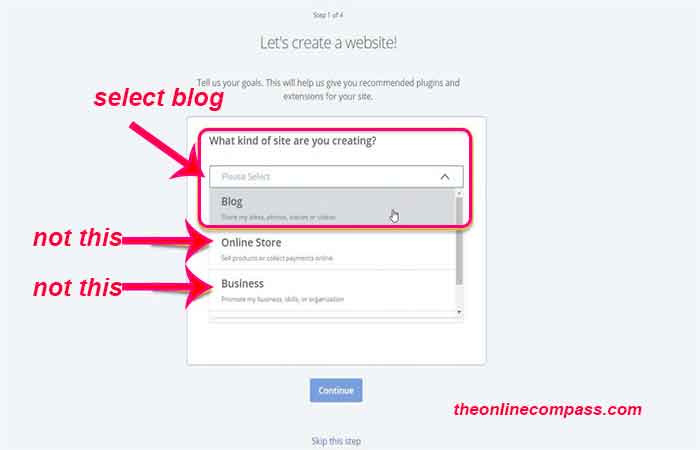
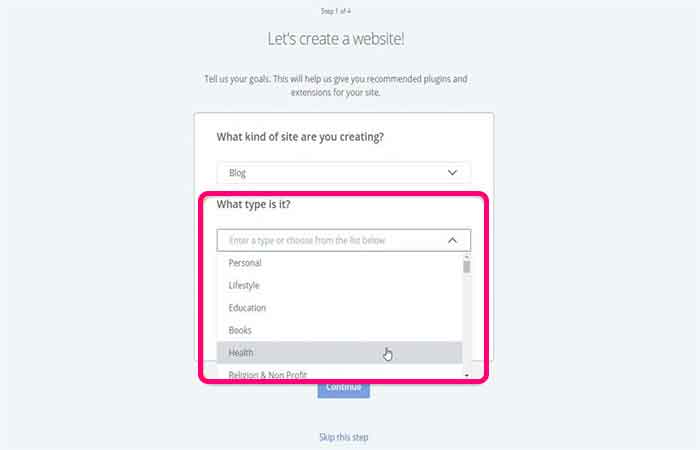
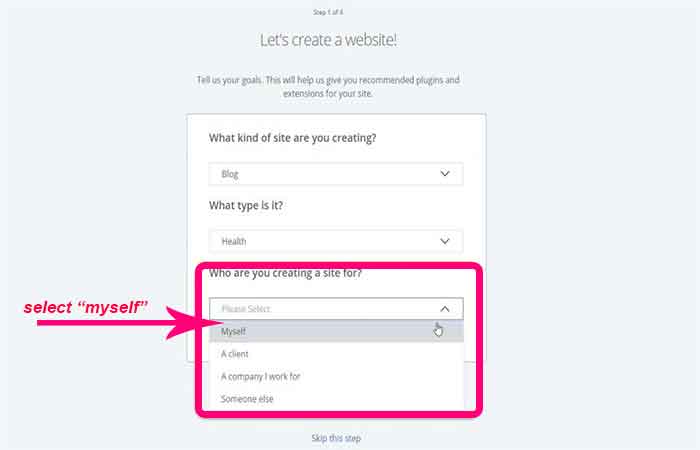
At this point, Bluehost will start a 4-step process to guide you through setting up your WordPress blog. Follow the steps below and complete the setup wizard.
Bluehost will require some details about you. Bluehost is just trying to get some details about the site you want to make, this will help them give you the right support.
The more you tell them the better.
Answer the questions as follows;
Now, let’s input some details into your blog.
Site Name: This will be the name displayed on your blog. This is not the URL, but simply the name used on
your site. It’s your domain name.
Site Tagline:This should reflect a brief description encapsulating the value you intend to deliver on your blog.
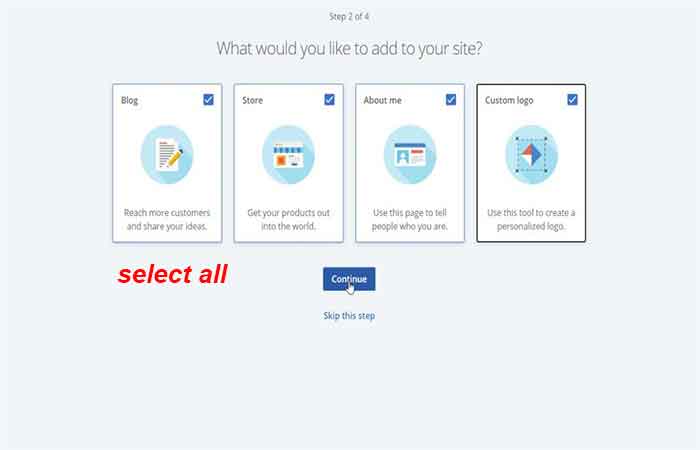
Want a blog? Of course, you’d want that.
Next, you’ll be prompt to choose a list of blog post on the home page. Choose home page.
Want an online store? You may need a store for your e-book or any other product later on. So this will definitely be yes.
Then hit continue.
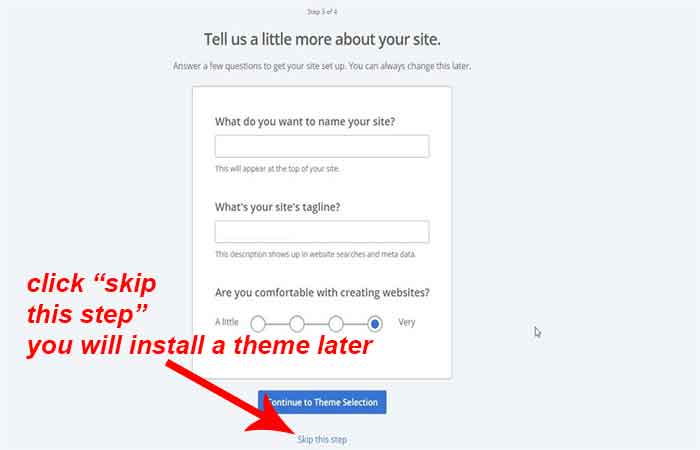
What’s next? The next section, ‘tell us a little bit more about you.”
Fill in the details and move on to the next step.
“Click Skip this step” (you will choose a theme later) because I want you to use the Divi theme. It’s a great theme and you should know how to use it.
All done! Voila, WordPress has been installed automatically by Bluehost. It’s as easy as that. Congratulations! You have just learnt the basics of how to start a blog.
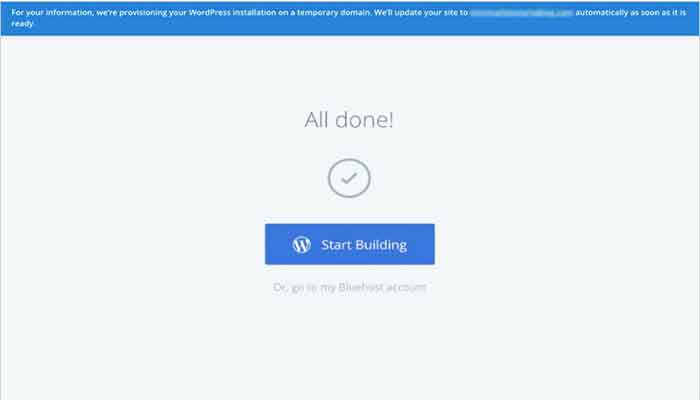
Next let’s get started with wordpress
Now your WordPress is installed. Hit get started to get to your WordPress dashboard!
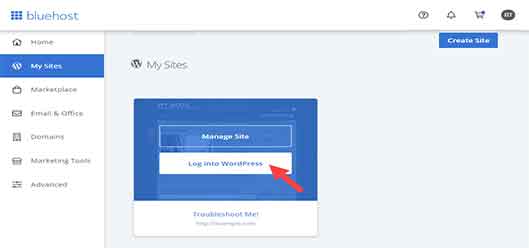
Click the My Sites tab from the side navigation menu to the left.
Hover over the site you wish to manage, and click Log into WordPress.
Hey, welcome to WordPress!
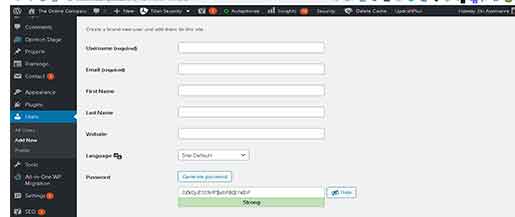
What you are going to do next is to dashboard, scroll down to ‘User” → “Add new”.
Create a new user account with a strong “password” and scroll down to update it.
Next, delete your old admin user by going back to “Users” (on the dashboard) → “All users” and delete the old admin user.
Now, this is your login details. You don’t have to use any other login details, you know your user name and your password.
Anytime you need to login to your site, you can visit yourdomainname/wp-admin. Next, log in with your user name and password.
For example, whenever I want to log into my site I type “theonlinecompass.com/wp- admin’ on the browser.
Next, I fill in my user name and password.
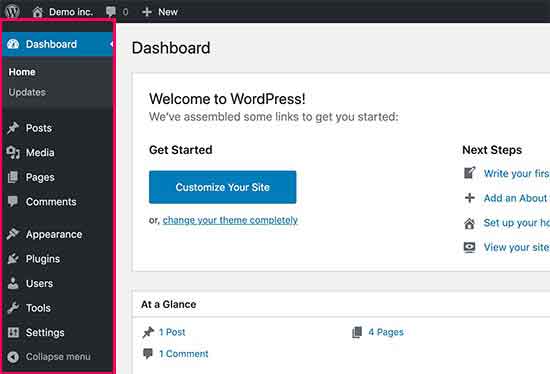
Step #5: Understand the wordpress dashboard
Your WordPress dashboard is the screen you see when you log into the admin area of your blog. This is where things get a little technical for a new blogger. The good news is that its easy to learn and master as long as you are ready to commit a few hours each day to it for a week. You don’t have to try to master everything in a day. To make it easy for you I am just going to show a basic overview of the dashboard.
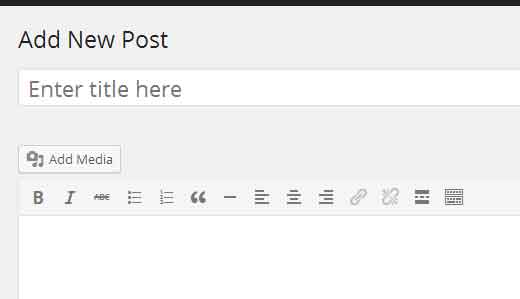
1. Post editor – After you’ve logged into your WordPress dashboard, you can find the post editor screen in the “Posts” section of the left sidebar. The editor is found at Posts >> Add New. Click this link and you will be taken to the post editor section of WordPress.
2. The category section: is used to indicate sections of your site and group related posts. It sorts the group content into different sections. It is a very convenient way to organize posts.
To access the Category section follow the step −
Step − Click onPosts → Categoriesoption in WordPress
3. Pages are static content and often do not change its displayed information. To add page
− Click onPages → Add New
4. Media Library; This is where you keep all the images, audios, videos and files that you can upload and add to the content when writing a Post or Page.
5. Plugins- This adds the unique features to an existing web site. Plugins extend and enlarge the functionality of your blog.
Step #6: How to install blog theme.
What is a blog theme?
A blog theme enables you to create the design of your blog.
Now, this is where you have fun showcasing your personality by your choice of colours, fonts and graphics and your writing tone.
There are different themes on the market but my prefered blog theme is divi theme.
It’s also a favourite wordpress blog theme among successful bloggers because it’s optimised for SEO and gives a beautiful blog design.
I’m going to give you my candid advice on choosing a blog theme because I appreciate your decision to learn how to start your blog using my tutorials.
There are free and premium blog themes available for your blog.
And most professional bloggers including me would advise you to use a premium theme.
Using a blog premium theme is the best thing you can do to start of your blog.
If you can spare extra $89 you can start off your blog with a professional theme.
I know some new bloggers may not have this money and would prefer to go with the free blog theme. Which is quite alright!
However, it has it’s set back. Going with the free theme can lead to a lot of frustration down the line because it can take years without the developers updating it.
The implication of this is that sometimes your theme may not be relevant. Whereas, the premium theme developers are always on the lookout for their customers’ needs.
As a new blogger, the uniqueness of your blog makes you noticeable. It’s really important to give your blog a great blog design, and premium themes allow you to do this.
In addition, designing your blog with a premium theme gives it a boost in search engine. Nowadays, people are consuming content on mobile more than on tablets and desktop. With a premium theme, your site is optimized for mobile, tablet and desktop.
My recommendation is for you to go for the premium blog theme if you can afford it.
Commit to a premium theme and it will serve you well in the future.
I know absolutely nothing about coding but look around at my blog design. I did this with Divi theme.
Divi theme is created by the team at elegant theme and it’s an uncomplicated theme that’s newbie blogger friendly. It can easily be customised to your taste.
Maybe you are not so sure yet if its a good option for you.
Check out some recent sites I created for my client with Divi theme.
You can try it here for free. If you are not satisfied you can make a switch.
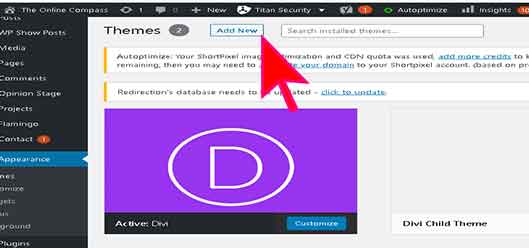
Go to your WordPress dashboard and click on “appearance’ on the left-hand side = Click on “add new.”
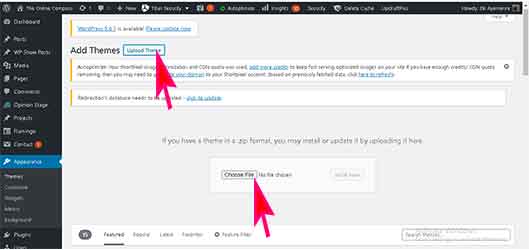
At the top “upload theme’ to upload from the downloaded zip file from your computer.
Once it uploads, click install and activate.
HOW TO INSTALL FREE BLOG THEME
If for budget sake you are uable to go with my advice to use a premium theme. That’s okay.
Here’s how to install a free wordpress blog theme.
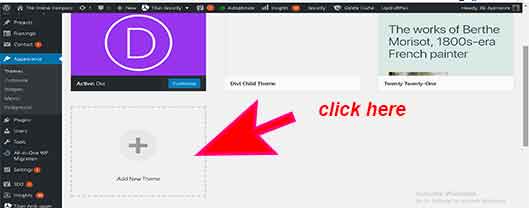
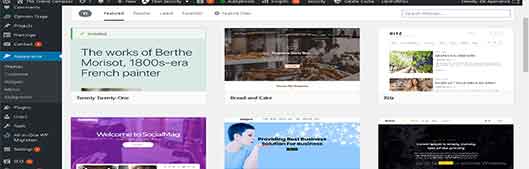
Go to “appearance” on WordPress dashboard – click on ” theme” -choose any of the free themes – install and activate.
Select your free blog theme and install.
Step #7: Create content for your new blog: The first 4 post idea for your new blog
Wow, you’ve come with me this far! Congratulations!
Your next step is to create content for your blog.
I promise you if you do this right you’re going to;
Attract the right readers to your blog
They will want to stay with you
Share your content, and even spread the news about your blog by word of mouth.
And eventually, become buying customers.
What should your first blog post be about?
Your first blog post should be so captivating that any reader that falls on it will have no choice but to come back next time for more.
This is what I recommend,
Solve a problem in your niche.
This is your first blog post! Let readers know what you can deliver.
Don’t publish “just anything.’
Do it right with your first blog post, and you will get loyal followers.
When I started the online compass blog I didn’t have a mentor. I did a lot of things wrong, including my first blog post.
But, I am happy that you are here and you gave me this opportunity to advise you on the way to go.
Make your first blog post a solution to a problem in your niche. I promise you, you won’t get it wrong that way.
I have heard people saying you have to make your first blog post about yourself and why you created your blog. Don’t worry about that you have a dedicated page on your blog for that called the ‘about me page.”
Moreover, you can use your sidebar to tell people who you are (showcase your beautiful picture), and what your blog is about.
As a new blogger, your content must be organised in such a way as to take your readers on a journey to ultimately achieve the solution to their problem, and also generate revenue for you.
I encourage you to write your first post immediately and publish it. And then draw up a schedule that is convenient for you to work on the other 3 posts.
Step #8: What to do after your post is published
The next step is to know what to do immediately you publish your blog post. Immediately you publish your blog post the next step is to attract traffic to your blog.
It’s the norm for many newbie bloggers to publish their post, and sit waiting for their dream traffic to locate their content.
In the ever-growing B2B market, it's more important than ever to find qualified leads and grow your business. But how do you effectively reach your target audience online?That's where strategic online marketing comes in. Online marketing is the use of digital channels...
Why Choose a Digital Marketing Agency in NigeriaIf you're a business owner in Nigeria looking to increase your online visibility and attract more customers, you need the help of a digital marketing agency. A reputable agency can help you create a strong online...
Take advantage of Shopify's eCommerce website builder for small business free trial. Sign up for $1 per month. This will help you evaluate firsthand the effectiveness, ease of use, feature richness, and value for money of e-commerce website builders for small...
There has never been a better time to launch an eCommerce business than today. Online retailers in every industry have it so much easier thanks to the best eCommerce website builder for small business.. Simple issues like inventory size and sales volume are no longer...
This post will show you how to download tranparent images from google in 5 simple steps. Step 1: Search for your image on Google.Underneath the google search bar click on "images" to see only images.A faster way to search images is to...
YouTube to MP3 Converter for Chromebooks is capable of converting YouTube videos to MP3 format without loss of quality and it supports most popular formats. YouTube is the largest platform for videos. As a result, it is the best platform for downloading, converting,...
If you want to download your favorite songs and videos from YouTube, it's important that you select the best YouTube to MP3 Converters. The best YouTube to MP3 Converters can assist you in achieving your objectives, from selecting the best video quality to downloading...
We found the best cheap web hosts for anyone that wants to build a blog on a tight budget. In this hosting review, we did not only consider the cheapest website hosting but also considered the best hosting companies with the cheapest hosting and domain registration....
Hostinger was an unknown web hosting provider a few years ago, but today it’s a major player in the industry. It’s drawing attention for its affordable price (which is just under $2) and its easy-to-use interface. If you are looking for a reliable hosting service on a...
Write for us-guest post/Are you looking for a guest posting opportunity? Are you able to craft compelling posts and submit content in the areas below?How to: Write for us - guest post/ submit content to the “the Online Compass?”Step 1: To write for us send me an...